
EOSS Upcoming Flights
-
05/18/2024 - 07:00 to 14:30
-
08/03/2024 - 00:00 to 23:45
-
10/19/2024 - 00:00 to 23:45
-
11/02/2024 - 00:00 to 23:45
-
11/09/2024 - 00:00 to 23:45
Packet Terminal
From the main screen there are two choices for Packet data.
-
Packet Terminal
For information on Processing a packet data file captured by Balloon Track or any other Packet Terminal program see the "Importing APRS Data" page.
The Packet Terminal Screen
Starting with Version 1.6.6, the packet terminal screen has been substantially improved.
Improved? Well, to say the least, previous versions of this packet terminal were abysmal in their user friendliness and they tended to crash quite a bit.
Version 1.6.6 is essentially a brand new packet terminal. I did keep some code to do the real time display stuff, but the entire handling of the communications port and incoming data is brand new and so far, in several dozen hours of testing, bug proof. Something will turn up, it always does. But, this is pretty solid code.
New in Version 1.7.2 the entire comm routines are now interrupt driven. This greatly reduces the overhead on processor usage by this screen and makes it more reliable.
At Startup
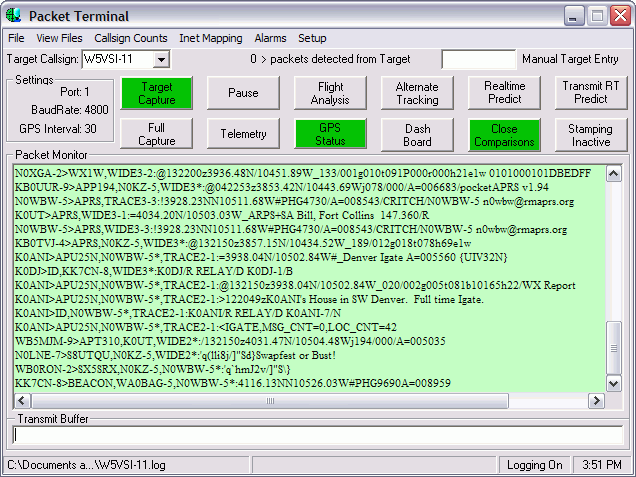
Immediately upon opening, the screen starts displaying data received from your com port unlike the previous non-intuitive version where you had to press a button to start the thing. With just a couple of clicks, you can select a target callsign and begin logging the packets from that callsign.
The Packet data screen ONLY acts as a rudimentary packet radio terminal program. It will build files that contain, ALL packet data, only packets from the Target Callsign or extracted range and bearing information about the target callsign. You can write any of the files individually, or select any combination of all three. You do so by clicking on the File Menu and choosing the appropriate item or in the case of Target Callsign and All callsign packets, you can click on the buttons on the screen. Note the color coded buttons. Green means they are active. In the screen shot above:
-
A Target Callsign capture file is open and recording any packets received from W5VSI-11.
-
The GPS Status is open (in another window).
-
The Comparison Screen is open (in another window).
The other buttons, not highlighted in green indicate they are inactive.
The Controls
The Menu
-
File
-
Save - see notes about file naming conventions at bottom of page.
-
Autosave Real Time Data - The Flight Analysis relies on a data file containing information received from your balloon during flight. Clicking on Autosave will set the program to automatically open and save flight data each time it is received for the Target Callsign. This data file is for internal use only. However, it is readable by a text viewer or a spread sheet program. SEE WARNING AT BOTTOM OF PAGE!!
-
Save Packets for Target Callsign - Opens a file and captures ONLY the packets received from the station you designated as the Target Callsign.
-
Save All Packets - Opens a file and captures ALL packets received
-
-
Open Simulation - Opens any text log file containing flight information and processes it through the packet terminal. Useful for testing, and replays of flights.
-
-
View - Only active files will be displayed on this menu
-
Target Callsign File - Opens the currently active file
-
All Packets File - Opens that currently active file
-
Real Time Log - Opens the currently active RTD file.
-
Flight Record - Opens a screen that displays data accumulated during the flight
-
Any Text File - Opens a dialog box where you can pick any text file for display. Good for examining inactive files above.
-
-
Callsign Count - Opens a window where all callsigns heard are displayed with information about packets sent by that station.
-
Inet Mapping - Opens a web page showing the current location of the target callsign
-
Alarms - Set a rate of descent which when exceeded sounds an alarm
-
Setup - Opens the program setup screen pointing to the appropriate tab. You can enter default values used in the Packet Terminal here (com port parameters, Time intervals, Autosave RTD, etc.)
First Line of the Screen
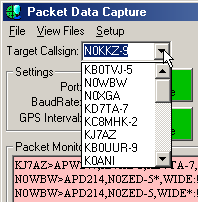
Target Callsign
The Target Callsign entry box is now a drop down combo box. You can type a callsign directly into it, or choose one of the callsigns from the list. You have to type really, really FAST :-) to manually enter a callsign.
Every time a new packet is received, this control is refreshed and will probably jumble up any manual entries. However, if it moves along too fast for you, just enter the callsign in the Manual Target Entry box at the top right of the screen and hit return/enter on your keyboard and that callsign will become the Target Call. You could also click on the Pause button to stop incoming packets and offer you the opportunity to pick a callsign from the drop down list without it being constantly updated.
By the way, the tab key will bounce back and forth between the transmit buffer and the manual call sign entry box.
The last several callsigns heard are shown from the most recent at the top to the oldest at the bottom of the Target Callsign combo box's drop down list. Duplicates are discarded and the callsign moved to the top of the list.
Packets Detected from Target
Each time a packet is received from the target callsign this number is incremented. In the screen shot above, 2 packets have been received so far from K�ANI.
Manual Target Entry
Type in any callsign you wish to monitor, hit enter/return and that will become the active Target Callsign.
The Buttons
For details on another screen, click on the link to that screen.
-
Target Capture - Toggles open and closed the capture file for the target callsign.
-
Full Capture - Toggles open and closed the capture file for all packet data.
-
Pause - Toggles open and closed the com port and pauses or resumes input.
-
Telemetry - Opens an EOSS proprietary telemetry decoder
-
Flight Analysis - Toggles open and closed the Flight Analysis Screen
-
GPS Status - Toggles open and closed the GPS Status screen.
-
Alternate Tracking - Toggles open and closed the alternate tracking screen where you can see relative position to up to 4 different ground stations.
-
Dashboard - Opens an older version of the flight analysis screen.
-
Real Time Prediction - Loads data acquired during ascent into the prediction module of the program.
-
Open Comparisons - Shows the Comparison screen
-
Time Stamping - Toggles on and off time stamping packets in log files.
The Terminal Window
Packet Monitor - The upper portion of the window displays incoming packets.
The background color is significant. WHITE, means you are not saving any information to capture files from which Balloon Track can extract data to produce upper air wind files.
Green, as shown in the full screen capture above, indicates that you are capturing the smallest amount of data that can be used in producing predictions, namely, all packets from the target callsign.

The "pink" background indicates you are capturing good packet data that can be used for prediction purposes. However you are capturing ALL packets received from the TNC and thus eating up disk space. Of course, in today's multi-gigabyte hard drive world, this isn't as meaningful as it once was. You should take note that your balloon data will be mixed in with data from all other packet stations heard on that frequency.
hint: Open both the Target and ALL capture files. That way, you'll have a filtered file containing only packets from the balloon that may be useful to you or others in your group. And you will have a complete file of all packets heard during the flight. Useful if you want to keep a log of airborne digipeater usage.
Transmit Buffer - The Lower portion of the window is a transmit buffer. Type in any commands for the TNC here and when you press the enter/return key they are sent.
Using this capability you could change things like headerln (must be off), the callsign of the TNC, whatever. Note of Warning:
When used with a KPC-3 Plus, if you enter some modes then return to "normal", this screen won't allow you to talk to the TNC. Enter a Control-C and you should get back the cmd: prompt. A specific example you might test: connect to the TNC's mail box. When you leave it, you won't be able to talk to the TNC any longer. The Control-C recovers nicely.
A new button to the right of the Transmit buffer labeled "APRS MSG" which is not visible in the screen shot above opens up this window:
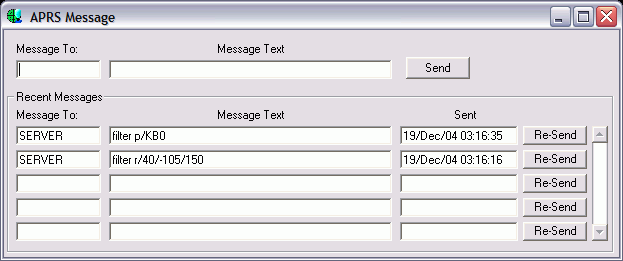
If you have an APRS-IS Passcode and are working via TCP/IP you can send in filter requests. If you do NOT have a passcode, then you are out of luck with this messaging screen on TCP/IP. However, you can just close the Packet Screen, open the Setup Screen and edit the filter being used there. When you reconnect to the server by opening the Packet Screen, the new filter will be in effect.
I haven't yet added (but intend to) the messaging capability to RF Comm port usage. Meaning, if you are using your own packet radio station you'll be able to send messages. That should appear pretty soon.
The Status Bar
At the bottom of the screen is a status bar with 4 boxes. From Left to Right:
-
Target Callsign Capture File - If open, the name of the target callsign capture file is displayed here. You can CLICK on the name in the status bar and that file will be opened and displayed in a text viewer.
-
Full Packet Capture File - If open, the name of the full capture file is displayed here. You can CLICK on the name in the status bar and that file will be opened and displayed in a text viewer.
-
Logging Status - This refers to the logging file for Real Time Data Analysis (Flight Analysis). Clicking on it toggles the log file on and off.
-
System Time - As set in the Windows operating system
Workflow
Initialize Data Capture
I recommend you ALWAYS open a Full Capture file first. This way, all data received during a flight is available. If you enter an incorrect target callsign, you will still be able to generate a touchdown prediction after burst using this file.
The next thing you should do is enter a target callsign. Balloon Track will default to the callsign as entered on the Setup Screen. Change it if necessary. This will restrict Balloon Track to processing only GPS/APRS data associated with that callsign. All incoming packets will still appear in the Packet Monitor.
Next, click on one of the Capture buttons or open the file menu and select one of the capture methods. Remember, the program does NOT automatically create data files any longer. You have to take affirmative action to open a log file.
Monitor the Flight
Click Alarms on the menu and set an alarm for various parameters you wish to be alerted on. When you close this window, the values are saved to the default INI file. See the Alarm Page for details.
During the flight, if you wish to see the data received in a more human readable form you have several choices.
The "Dashboard". Each Target Callsign packet is processed and that data is displayed on the "Dashboard". This screen only shows the data received from the last valid position fix.
Flight Analysis. This screen will show an analysis of the flight including data on the current position, as shown on the Dashboard and it will display updating charts and data on the flight as it progresses. See the Flight Analysis page for more detail.
Alternate Tracking Station. You might also want to know the range and bearing from a second station. Open the Alternate Tracking Screen. Whatever information you entered on the Setup Screen for the Alternate Station will be used to generate another set of Range, Bearing, and Elevation values. See the Dashboard Page for more info.
Build a New Prediction
At any time during the flight you can "simulate" a balloon burst and predict a new touchdown. It's just couple of mouse clicks away.
1.)Click Extract Data
The Importing APRS Data screen opens. The filename of your capture file has automatically been entered as the Source File. Hopefully, the target callsign is selected "automatically" by examining the input file to see which callsign appears most frequently. I'm guessing that most of the time, a balloon will beacon out more frequently than just about any other type of APRS station so it should pop up. To guarantee it does, be sure to open a Target Callsign log file. It's the preferred type and will only contain one callsign and work every time.
2.) If the target callsign does NOT appear in the callsign key you'll have to pick it out of the import display box.
3.) Click on Make Data File, Load into program.
That's it. You just created a prediction assuming the balloon just started descent.
In actuality, once the balloon has burst, or cut down has occurred, you should follow this same procedure. The Extraction routines, will detect a descent beginning at the end of the capture file and predict a "real" touchdown point based on the winds encountered during ascent to the highest altitude recorded in the capture file.
File Naming Conventions
All these files have hardcoded filenames that are set only by the program. You can NOT set them yourself. All files are appending files, that is new data is always added to the end of the file
Autosave Real Time Data: SEE WARNING AT BOTTOM OF PAGE!!
-
The file is created with the file name "Flightname.RTD", where flightname is the name you set for the flight on the setup screen.
Target Capture File:
-
This file is created with the filename "FlightCallSign.LOG" where FlightCallSign is that callsign as entered on the setup screen.
Full Capture File:
-
This file is created with the filename "full_packet_2001_02_01.LOG" where 2001_02_01 is the date in the form Year_Month_Day.
Altitude, Bearing, Range, Course, Speed File:
-
This file is created with the filename "ABRCS_2001_02_01.LOG" where 2001_02_01 is the date in the form Year_Month_Day.
WARNING:
The Autosave Real Time Data file and Flight Analysis are cross dependent on each other. Several things may corrupt the Flight Analysis.
- You don't start a Real Time Data Log.
- You already have a log with pre-existing data that is unrelated to the current flight.
- You have the incorrect Target Callsign Entered
To minimize the first two problems the program takes these actions.
- Each time you open the "Flight Analysis" screen, Autologging is turned on regardless of the default settings.
- Each time you open the "Flight Analysis" screen a prompt comes up to ask if you wish to "Clear the DATA File". Prior to a flight say YES. However, if you close the "Flight Analysis Screen" at any time after liftoff and reopen it later during the flight be sure to say NO to this prompt. If Balloon Track crashes, when you restart and reopen the "Flight Analysis" screen say NO to this prompt and you will resume logging the flight and all graphs and data will reappear when the next packet arrives. Otherwise you will lose all data for that part of the flight prior to your reopening this screen.
I can't help with the bad target callsign problem. Just make sure you have it set to the correct callsign of you APRS/GPS beacon or you will not be able to use the Dashboard or Flight Analysis screens.
If you open a capture file for ALL PACKETS prior to lift off but inadvertently set an incorrect Target callsign, you can still generate a prediction for touchdown after burst. Open the Extract screen and select the correct log file and enter the target callsign on the Extract Screen and you'll be all set.
If you incorrectly enter a target callsign on the Packet Terminal screen, you can always recover by correcting it. The Target Capture will only contain data from the time of correction until the end of flight. The Real Time Data file may have data collected from the previously entered Target Callsign. In this unique case you should "Clear the Data File" to ensure only data from your balloon is saved to this file. You will then be able to view updating data on the Dashboard and Flight Analysis screens.